Bonjour,
I have been gone for a while, but I want to let you know I am still here. I am finishing up my Bachelor's degree, still sewing, and taking up some new hobbies too. I will touch on all of those. I have moved my sewing post to a LiveJournal so you can find more at https://jessiharm.livejournal.com/
So, on my LiveJournal, I mention that I got really sick around Thanksgiving and spent time in the ER, and then was fired from a job for going over my "allowed time for the year". I was under a year so I didn't have all the time off that they gave to the employees once they reach the full year. So I have been unemployed since then. I have been focusing on school, sewing, and further developing my photography.
This is a good way to segway to my new hobbies. So I have been learning French for about a year, not groundbreaking, but since I have been doing 18th-century sewing, I learned I prefer the French fashion and architecture for this time period, then I developed an interest in the food, and ultimately would like to make an outfit and take a trip to the big carnival in France one of these years.
Lastly, I am doing some photography. I used to dabble in high school with my parents nicer point-and-shoot, then years later around 22, I played with a cheap Canon camera my friend got from Fingerhut... I suggest you never buy from them, way overpriced... and I didn't know how to use the manual settings, so I played in the auto. I never took good photos but I was always told I know how to frame the shot I just needed to learn to use the camera.
However, fast forward to now, I am 29, almost 30, and I wanted to get a nice camera for some of my side projects. I needed to get a camera that took larger images of a higher quality for some photoshoot compositing, finished sewing projects, and things I would like to sell. I also love portrait photography and creative photography, so I decided to invest in a nice camera.
I got a used Nikon 7100 that came with an 18-140mm. I have been getting a lot of use out of it. When I made the decision to buy the camera I started doing lots of research to learn how to use a DSLR camera, how to shoot manual, composition, and so on. I watched Phlearns Pro Tutorial on Photography 101 which is 14 hours long that covers EVERYTHING you need to know. So now I just need to apply that I have learned. I did my first photoshoot with my little brother for his business which went really well and already booked an engagement shoot. I will post a separate blog on that.
Lastly, I am going to be launching a youtube channel with various content, so that will be up soon.
That's my update, for now. More to come soon.
Jessi Harm
Showing posts with label sewing. Show all posts
Showing posts with label sewing. Show all posts
Monday, March 19, 2018
Tuesday, February 14, 2017
1700 stays: The journey continued
 I HATE SEWING STAYS!!!
Okay, hate would be a strong word, and it's not the sewing that I hate, it's the mock up and fitting process. I am on my third 1700s stays style and 6th mock-up. This recent (the third) style I took from Corsets and Crinolines but ended up drafting my own block.
This picture is taken from the book. It's a late 1700s style and it is only two pattern pieces, so for someone who had to lots of adjustments I figured this one will be perfect. Fewer seams to adjust.
Now this pattern I used for reference on pieces and boning channels, but I did not grade this one up and print. I used as a visual guide as I took my own measurements and drafted my block. I'll do details on that later. I'll also include links to good stays construction resources at the end.
I have added some pictures of my latest mock and added snippets under about them.
SOME CONSIDERATIONS: As you view the pictures please be aware that drafting and fitting stays on a dress form is a terrible idea mostly because stays are worn with slight compression, (the squishier you are, the more potential for compression) however the dress form doesn't give. The breast doesn't smush, overall it doesn't compress as a natural body would, so I have been doing the fittings on my body but for pictures, I pinned to the form. You have to fit and alter on your own body for this particular garment. I mention this though because I know the muslin mock looks wrong on the dress form. Trust me, its good on the body.
 This is a shot from the side back. My dress form slip is super sloppy so please disregard. I got the back piece drafted nicely. I am currently really happy with it. The nice thing about this style is if I get the back piece right, then I know I only have to work on the front.
Fun fact is in late 1700 the designer realized that the shape of stays really came from the direction of the boning and not having multiple seams and their shapes. That is why as we move through the century popular styles have less pattern pieces. Not all style however.
 This is the front. My biggest challenge is I have large boobs and because I have an apple shape and gain all weight in the belly I feel it wants to bow in at the waist. I want these stays to be longer looking, so that means a lower front and a longer center front. One suggestion made to me was using a busk to support the front. A good option for this is a wooden paint stirrer. just shape and smooth.
When deciding how low/deep you need the neckline depends on the size of your breast. It's typically about an inch or so above the nipple but because I have larger breast I did a little higher to ensure they won't bubble and spill over.

The center back lacing should be about 2-3 inches, and since I am squishy I opted for 3. Ideally, I will lose weight so this will give me some room.
Another random fact, but depending on how you lace with also dictate how you may fit in the stays. Top to bottom can have a different look or fit than bottom to top.
Stays were laced with one string in a spiral style versus the common victorian style of criss-cross.
Robe a La Francaise Adventure by Enchanted Rose Costumes: She has videos for each part of the outfit. Stays, pockets, chemise, paniers, garters, stocking and so on. Great construction overview.
Merjas 1780s Stays from Before The Automobile: All her stuff is amazing, well researched and beautiful, I linked to my favorite project of hers, but please view it all.
Rococo Atelier: 18th Century Stays Construction: They have a good overview of the construction process
Green Marthas Blog on her stays construction: It's in french but google has a good in browser translator, please great pics for her construction overview.
Battle of The Stays: The author compares popular style patterns against each other so you have an idea of how they look. Great reference.

Monday, January 16, 2017
1700s Stays: Maybe not the Simplicity Pattern
Hello Everyone,
Being that I am a novice to all things sewing, I am not trying to make more alternations than I need too, however, I am finding due to my apple shape and large breast that everything under the sun needs alterations. The pattern I was originally going to use was going to require a lot of additional alterations, so I switched it out.
What happened?
I belong to a few different sewing groups on facebook, for corsets, and 18th-century sewing and what I learned recently is that the American Duchess for Simplicity version was scaled weird when simplicity got the drafts from their creator and are too short. This came from someone at the company, so I was advised it is still a great pattern for starting, however, it needs to be lengthened. This pattern was originally appealing to be because of the front and back lacing would allow more flexibility for fitting my chest and belly.
The thing is, I have never made stays before and in addition to figuring out how to add some room to the sides and techniques to accommodate my chest, I didn't want to deal with how to lengthen a pattern correctly too. Especially since I am getting burnt out already. I have made 3 mockups so far, two out of cloth, and one out of cardboard. (amusingly enough, I also found I was constructing the cloth stays wrong, so I had to completely start over.)
From here on out I am going to be using a different pattern, the Butterick 4254 Version. I was going to do that back lacing only, but the more I thought about it, the more I realized that would make getting in and out on my own difficult. So I am doing the front and back lacing version, however, I do still need to add some room for my chest, and I will need to add some room to the waist.
I have no expectations of these first stays being anything wonderful so they will be a little more crudely constructed, I will probably use metal eyelets and machine sew everything that can be, and keep it for my LARP characters costume. Once I figure them out, I will make a more elegant version for my Halloween costume.
I need to get more muslin for this, so It will possibly be a week or so before I have another update. I am sorry for the inconsistent postings.
I am also working on my first draping project so I will let you know how that goes too.
Thanks for reading,
Jessi
Sunday, October 16, 2016
Vintage Vogue Dress: V8789

So, this is the lovely Vintage Vogue circa 1957 that I recently made and it was surprisingly easy. I bought this beautiful cotton sateen by Gretchen Hirsch a while back with the intention of making a princess seamed peplum blouse, but when I decided on this for a wedding I knew the fabric was perfect. I did the boat neck version on it, however, other than the bodice necklines everything else is the same.


I rushed to meet the wedding date, so I need to make a few fixes and then I will post pictures of the cute button details on the shoulders, and maybe I'll model a few too.
Tuesday, September 20, 2016
McCalls M7154 Update: Stress

Currently, I am trying to understand how to do as fba on this thing. The dress has an underbodice and an over bodice, so it's not treated as and doesn't function as a lined piece. The underbodice is a standard two dart bodice construction and is more form fitting. It's inside and not really seen. Then the overbodice is a looser, no dart, free-flowing piece that has a slight shrug appearance.
The finished measurements on the underbodice are 47 inches, and my full bust 49ish. Both pieces need an fba of about 2.5 inches (an addition space of 5 inches in the finished piece) to fit properly.

Now on a standard arm and waist dart bodice, the fba is very simple and straight forward, however,
the waist dart is off center from the bust apex about 3/4 inch so trying to get the right fba has been hard. I am already on the third muslin shell for just the underbodice alone. you can kind of see in the picture to the right how there is an undershirt. I would also like to add that even though they are two bodices they do intertwine each other as one.
*What I have done for the next alteration attempt shifted the waist dart to be centered with the bust apex, did a normal fba and then shifted the tip of the dart back to the 3/4 off center it was. Also, since I have added so much room to the side, I had to slightly adjust the position on the side dart as well.*
Then the next task which I don't think will be too bad, is the overbodice has no darts at all. So I am going to do the dartless bodice fba, and when you do an fba it will automatically add that arm/side dart, then I will do another adjustment to remove that.
Now this is just the bodice, you can see from the pattern pictures that there are also many pieces that create the hips and skirts. I may have to adjust those two.
What did I get myself into????
Wish me luck,
Jessi Harm
Evil Regal
Friday, September 16, 2016
Halloween "Costume; 1930/40s Evening Gown

So I have been thinking about what I want to do for my costume this year, and I am hosting a Halloween party on the 8th so I wanted to do something special. Originally I wanted to throw a masquerade-style party, but space and funds are limited for that, so I went simple and decided to do a pattern I bought over a year ago, its one of the first ones I ever bought, "Archive Collection Circa 1930" evening gown by McCalls. I have been dreaming of this for a while but have been too terrified to make it. I even bought a second pattern envelope in case something gets damaged since it was on sale.
Disclaimer: This is not just a costume. Any chance I get, I am wearing this.
 What I really love is the seams on the dress. I love how it drapes but is also tailored in the right places. I am going to be very careful with fitting and sewing because I want this to be near perfect. I found some lovely versions on Instagram and google, but you can see very quickly any errors made in these particular seams. I am nervous on how it will lay because I am an apple shape so I have been thinking of getting a set of appropriate foundations to wear under and basing my measurements and fitting with the foundations.
The Fabric I chose is Crepe Back Satin, and I decided to do an emerald green after I saw Kiera Knightley's green gown in the movie Atonement. I thought the deep emerald green would also allow for some old Hollywood glamor, and bring in some of the 1940s which I love. This fabric also has some texture to it, so I think it will really show off those unique seams as well and do fabulous light play.

There are a few changes I am going to be doing.
First is a full bust adjustment. Needs to be done. The second is because I am so large in the chest I don't want the open in the back because I need to wear support, so what I want to do is some of the pretty cloth covered buttons and little button loops. This is new for me, so I am sure that I will say lots of naughty words.
I will keep you in the loop as I go step by step, and let you know of any changes, issues or concerns I have.
Make sure to check out my Instagram account for pictures of other fun finds and adventures.
Jessi Harm
Evil Regal
Tuesday, August 30, 2016
McCalls 6819 Finished: Evil Regal
 The Evil Regal is back, and her new outfit is awesome.
So here is the nearly finished product on the dress form, getting the approval from Ms. Abby Cat. This is the almost completed product I referenced in my last blog. I did everything last minute. With hours left to go, I got the grommets done, hemmed the bottom, did some final fittings, finishing touches, and voila.
So I love this dress. It is so much fun. Below is a picture of my outfit at Michigan Renaissance Festival opening weekend. Also, note my awesome Son of Sandlar boots, I have been coveting a pair for years. My favorite thing about this coat is how with very little wind or effort it billows out when I walk providing the perfect dramatic effect. The only thing this outfit needs is a fabulous hat to pair, and a different shirt. (I also intend on getting some great leather gloves to match the hat and boots.)
There are some changes I will make next time around, and there will most definitely be a next time around.
 First, I made an error when I was constructing the bodice, and I made it a little shorter on me than I would prefer, so when I put on my belt you can't see the tabs in the front. It basically sits right above my waistline, and it should be just below.
Secondly, because I knew I was going to wear a corset I opted to not do a full bust adjustment, and bust apex reposition, because of that I also opted to not do the hook and eye closure in the front, or lace ties in the back. Next time around I will, and although I still don't know if I am convinced on hook and eyes, (mostly concerned about their durability while LARPing) I will say I think it would have looked a lot better. I hate the space in lacing at the top and then they are completely closed at the bottom.
I did see one other lady wearing the same pattern, but hers was made with stiffer fabric and a cotton lining so it held its shape really well. Hers looked nice and crisp, she did the hook and eye in the front and ties in the back. When I saw her outfit I wanted to remake mine immediately because it looked so amazing. She had hers made for her by a professional and it really showed. She wore hers with a skirt under it and added other feminine touches. I love how versatile this piece can be.
 I am considering making a second version of this for larp, and later in the fair season when it cools off and the rains get really bad. I did notice with the length on this one if I am walking up anything I step on it, so running and swinging a sword may prove difficult.
I made some awesome new friends at fair too, (shout out to Chris and Chris) who loved the outfit
and were down to help with the next one. That one I will most likely do the full sleeves, heavier fabric, but a shorter asymmetrical skirt similar to this picture. So the M6819 pattern, but just change the skirt style. Chris and Chris also suggest the use of trim and stones which are a must do. When I begin that one, I plan on doing a more step by step tutorial.
Please leave your thoughts, tips, tricks and experiences below.
xoxoxo
Evil Regal, aka Jessi
Sunday, August 14, 2016
Renaissance Festival project progress: M6819 pt. 2

Originally I was going to include boning on the side and back seams for structure, but I have since nixed that idea since the bodice and skirt meet right at the waist line and my waist is short, even my apple shape doesn't warp the structure or how it hangs. Another change I mentioned doing was adding ties in the front to replace the hood and eye closure it called for, and I am still thinking of taking this route, or, I may do some buckles. Haven't decided that yet.

The pattern calls for decorative lacing in the back, but I haven't done that yet, and I am debating if I want too. It's solely decorative, and if I make the wide waist belt that also comes with the pattern, it seems silly because the laces would be covered up. (However, I am thinking of wearing a corset under, so we will see.)
This picture is everything that is included in the pattern packet. I am thinking for a second project of making the bodice with the all around skirt pleats, minus the skirt for a second project. There are so many ways to change the options up and have fun.

So this is the inspiration for the project. Regina is my spirit animal... of fashion. When I saw this picture I immediately thought of my pattern and knew this is what I wanted to make/use as a base. Michigan Renaissance Festival starts August, and goes until October, so I knew I needed something that would offer versatility for the dramatic weather we see in that time frame. We get heat with high humidity, we get lots of rain, and then it gets cold very quickly. I opted no sleeves since my chemise has the long sleeves, and I'll later layer a cloak. I am not part of the cast so I can have more fantasy in my outfit, so I wanted it to be less formal, but still feminine, and along the lines of pirates and roguish. I love this pattern for that.
 The pattern calls for lining, and the jacquard I got from the upholstery section was durable, but not stiff, so it lacked structure. I decided I would take the muslin shell of the bodice I tested and attach that to the lining to have it as an underlining. To be honest, I will never do that again. This was my first time with a lining, and it was frustrating at times to work with not two, but three layers. In fact, I hated the slippery lining I used. unless its a dress or something more delicate, I am using a muslin or cotton linings from now on. I know I will for my next bodice I am already planning.
Here you can see the muslin and lining inside out on my dress form as I was checking the seams and preparing to pin to the main fabric.

I LOVE THIS COLLAR. On my next project, I may exaggerate it even more. The little sleeve caps are so much fun too. Here is the collar, sleeve caps and bodice sewn up with the lining. It looks great. The collar and sleeves were so easy, you just pin to the edge of the fabric on the right side between the lining and outer shell, and sew it all up in once swoop. Once you do that and turn it right side out, everything just falls into place. The edge stitching was already done to the collar before it was attached to the bodice, I did double line of edge stitching on the collar, one line on the sleeves, and once it was all sewn together I did one line down the front and blended it into the collar.

My moms' cat Abby kept hiding under the dress form as I was working on the skirt, which I assume was just one giant tent to her. She is a beautiful minx kitty though, so I decided it was a great time to get some shots of her. I posted a few more on my Instagram. Here she is trying to be sneaky.
I got the skirt lining sewn and the unit attached but I still need to hem the skirt and lining. I deviated from the pattern instructions a little at this point. The pattern calls for the right sides of the skirt to be together and you sew up the sides, up the slit in the back and along the bottom, leaving the top open, but I needed to trim up fabric and lose some inches so I left the bottom open too.
 At this point, all I need to do is add the little decorative pleats, one on either side in the front closure, slip stitch the inside lining closed, which I'll do last in case I need to do anything inside the bodice, trim and hem up the skirt, add whatever front closure method I decide, and decide on the back ties or not. I also have some Kuchi jewelry from my belly dance days I thought about adding to the outfit for more of a pirate look. Not much more to go, and I should have it done in one, maybe two more days time. Fair is 5 days away.
I think this would easily be a long weekend project. I did work at my own slower pace, and on a few occasions I got over confident and ahead of myself which lead to me seam ripping and starting parts over. Over and over. Here is how it's panned out so far:
Day one: cut out pattern, made muslin shell of bodice to decide on fit and alterations (really more so a couple hours at night. I spent the day at JoAnns picking out fabric and notions.)
Day two: cut out lining, and main fabric, cut out sleeve caps, and collar, sew the bodice together, didn't do more because I was waiting for the boning to come in the mail. So I edge stitched around sleeves, collars, and caps
Day three: decided to nix the boning even though it came in the mail, cut out skirt and lining, and sewn them up. (at this point I think my sewing machine was over it because it started to jam on me all the time. I had to put the darning plate cover on to reduce the issues I was having. I have a singer curvy and I was told my the sales person it doesn't do well to layers and layers or heavier fabric.)
Day four: this will be the day I do my finishing touches, touch up anything else thing that needs it after I put on and move around, hem the skirt, and take lots of pictures for my conclusion blog. I'll make sure to get pictures of the details.
Friday, June 17, 2016
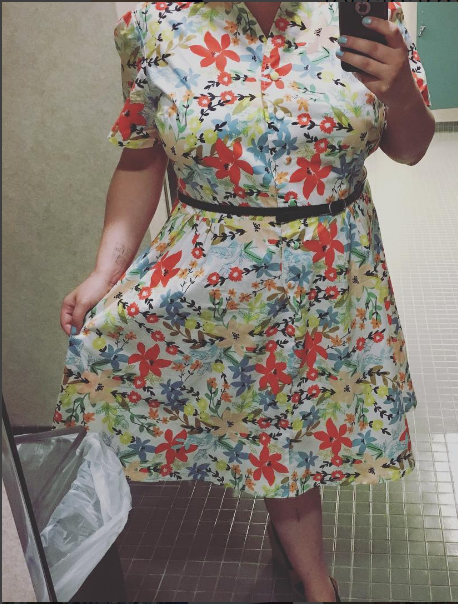
Summer Floral Flare
I recently got this very awesome Retro Butterick 1951 shirt-dress pattern in B5920 and had so much fun making it. Now I am a super beginner, and this is my first dress. I found it to be pretty easy to follow along with, however, you will notice the lack of the notched collar because I couldn't figure it out. I also ended up taking off a lot of length from the skirt compared to the original pattern. I am 5'5 and I like skirts and dresses typically right below my knee. This first picture was my finished piece. Again, room for improvements, but I really like this style. More shirt dresses to come.

(again with that garbage pail)
This is the dress still on my dress form with the tailor marks and original length. I wanted you to see the cloth buttons. I went to a vintage store and found a bunch of buttons, however, didn't like any of them and ended up getting a cloth button making kit to do my own out of the leftover fabric.

The only thing I want to do is find thicker, funkier belt to really cinch the waist. :)
Hope you enjoyed,
Comment below,
Jessi Harm
Monday, June 13, 2016
I am back... With Sewing!
Been a while. Got a Degree. Got a new Job, and oh yea... started sewing. :)
So earlier this year I discovered the amazing fabric and pattern designer, author and seamstress, Gertie, aka Gretchen Hirsch. I fell in love with her vintage, punky style. I bought all of her books and got myself some of her fabric too.
Recently I made a skirt out of her beautiful border print fabric, and followed a tutorial on her blog for a Dirndl style skirt. Links Below. Here is my creation. I paired it with a blazer and blouse from Target. It was light, feminine, fun and very spring :) This is her Rose Garden Border cotton Sateen fabric. I am a beginner. This is the 3rd finished project I have made so there was some room for improvements.
(please forgive the garbage pail in the photo)

It was really easy if you follow her tutorial, however I am bigger than she is, and I wanted some extra lushy fullness, so for my waist measurement of 41 inches, I got 2.5 yards of fabric.

Her tutorial is below, she broke it into two parts and I really don't think it needed to be that in depth.
Basically is two large rectangles for the skirt, sew up the side seams, but leave a spot for the zipper, you just need to know how you want your fabric to lay, and I like big hems, so after I chose my desired length, I added 4 inches for a big hem. Same with waistband. Two long rectangles of desired thickness, plus seam allowance, and width plus seam allowance, and I opted for some fusible interfacing.
Best thing about this skirt, its a rectangle, so its the easiest hem job ever. I hate hemming skirts.
Here is Gerties tutorial:
http://www.blogforbettersewing.com/2009/08/sew-full-gathered-skirt-part-one-make.html
http://www.blogforbettersewing.com/2009/08/make-this-skirt-part-two-of-gathered.html
Hope you enjoyed.
Comment below,
Jessi Harm
Subscribe to:
Comments (Atom)