Showing posts with label DIY. Show all posts

Friday, September 16, 2016

Halloween "Costume; 1930/40s Evening Gown

   
     So I have been thinking about what I want to do for my costume this year, and I am hosting a Halloween party on the 8th so I wanted to do something special. Originally I wanted to throw a masquerade-style party, but space and funds are limited for that, so I went simple and decided to do a pattern I bought over a year ago, its one of the first ones I ever bought, "Archive Collection Circa 1930" evening gown by McCalls. I have been dreaming of this for a while but have been too terrified to make it. I even bought a second pattern envelope in case something gets damaged since it was on sale.

Disclaimer: This is not just a costume. Any chance I get, I am wearing this.

     What I really love is the seams on the dress. I love how it drapes but is also tailored in the right places. I am going to be very careful with fitting and sewing because I want this to be near perfect. I found some lovely versions on Instagram and google, but you can see very quickly any errors made in these particular seams. I am nervous on how it will lay because I am an apple shape so I have been thinking of getting a set of appropriate foundations to wear under and basing my measurements and fitting with the foundations.

   
     The Fabric I chose is Crepe Back Satin, and I decided to do an emerald green after I saw Kiera Knightley's green gown in the movie Atonement. I thought the deep emerald green would also allow for some old Hollywood glamor, and bring in some of the 1940s which I love. This fabric also has some texture to it, so I think it will really show off those unique seams as well and do fabulous light play.

   
There are a few changes I am going to be doing.

First is a full bust adjustment. Needs to be done. The second is because I am so large in the chest I don't want the open in the back because I need to wear support, so what I want to do is some of the pretty cloth covered buttons and little button loops. This is new for me, so I am sure that I will say lots of naughty words.


I will keep you in the loop as I go step by step, and let you know of any changes, issues or concerns I have.

Make sure to check out my Instagram account for pictures of other fun finds and adventures.

Jessi Harm
Evil Regal

Sunday, August 14, 2016

Renaissance Festival project progress: M6819 pt. 2

     So we are about day three into the McCall's 6819 project and it's almost done. The construction was pretty easy considering. My biggest praise is the lack of hand stitching involved. I hate hand sewing, and other than slip stitching the inside of the bodice lining once you attach the skirt there really isn't anything else that requires it.  The picture here is the version I am doing. No sleeves or all around skirt pleats.

     Originally I was going to include boning on the side and back seams for structure, but I have since nixed that idea since the bodice and skirt meet right at the waist line and my waist is short, even my apple shape doesn't warp the structure or how it hangs. Another change I mentioned doing was adding ties in the front to replace the hood and eye closure it called for, and I am still thinking of taking this route, or, I may do some buckles. Haven't decided that yet.


     The pattern calls for decorative lacing in the back, but I haven't done that yet, and I am debating if I want too. It's solely decorative, and if I make the wide waist belt that also comes with the pattern, it seems silly because the laces would be covered up. (However, I am thinking of wearing a corset under, so we will see.)

     This picture is everything that is included in the pattern packet. I am thinking for a second project of making the bodice with the all around skirt pleats, minus the skirt for a second project. There are so many ways to change the options up and have fun.


   So this is the inspiration for the project. Regina is my spirit animal... of fashion. When I saw this picture I immediately thought of my pattern and knew this is what I wanted to make/use as a base. Michigan Renaissance Festival starts August, and goes until October, so I knew I needed something that would offer versatility for the dramatic weather we see in that time frame. We get heat with high humidity, we get lots of rain, and then it gets cold very quickly. I opted no sleeves since my chemise has the long sleeves, and I'll later layer a cloak. I am not part of the cast so I can have more fantasy in my outfit, so I wanted it to be less formal, but still feminine, and along the lines of pirates and roguish. I love this pattern for that.


     The pattern calls for lining, and the jacquard I got from the upholstery section was durable, but not stiff, so it lacked structure. I decided I would take the muslin shell of the bodice I tested and attach that to the lining to have it as an underlining. To be honest, I will never do that again. This was my first time with a lining, and it was frustrating at times to work with not two, but three layers. In fact, I hated the slippery lining I used. unless its a dress or something more delicate, I am using a muslin or cotton linings from now on. I know I will for my next bodice I am already planning.

Here you can see the muslin and lining inside out on my dress form as I was checking the seams and preparing to pin to the main fabric.


     I LOVE THIS COLLAR. On my next project, I may exaggerate it even more. The little sleeve caps are so much fun too. Here is the collar, sleeve caps and bodice sewn up with the lining. It looks great. The collar and sleeves were so easy, you just pin to the edge of the fabric on the right side between the lining and outer shell, and sew it all up in once swoop. Once you do that and turn it right side out, everything just falls into place. The edge stitching was already done to the collar before it was attached to the bodice, I did double line of edge stitching on the collar, one line on the sleeves, and once it was all sewn together I did one line down the front and blended it into the collar.


     My moms' cat Abby kept hiding under the dress form as I was working on the skirt, which I assume was just one giant tent to her. She is a beautiful minx kitty though, so I decided it was a great time to get some shots of her. I posted a few more on my Instagram. Here she is trying to be sneaky.

     I got the skirt lining sewn and the unit attached but I still need to hem the skirt and lining. I deviated from the pattern instructions a little at this point. The pattern calls for the right sides of the skirt to be together and you sew up the sides, up the slit in the back and along the bottom, leaving the top open, but I needed to trim up fabric and lose some inches so I left the bottom open too.

     At this point, all I need to do is add the little decorative pleats, one on either side in the front closure, slip stitch the inside lining closed, which I'll do last in case I need to do anything inside the bodice, trim and hem up the skirt, add whatever front closure method I decide, and decide on the back ties or not. I also have some Kuchi jewelry from my belly dance days I thought about adding to the outfit for more of a pirate look. Not much more to go, and I should have it done in one, maybe two more days time. Fair is 5 days away.


I think this would easily be a long weekend project. I did work at my own slower pace, and on a few occasions I got over confident and ahead of myself which lead to me seam ripping and starting parts over. Over and over. Here is how it's panned out so far:

Day one: cut out pattern, made muslin shell of bodice to decide on fit and alterations (really more so a couple hours at night. I spent the day at JoAnns picking out fabric and notions.)

Day two: cut out lining, and main fabric, cut out sleeve caps, and collar, sew the bodice together, didn't do more because I was waiting for the boning to come in the mail. So I edge stitched around sleeves, collars, and caps

Day three: decided to nix the boning even though it came in the mail, cut out skirt and lining, and sewn them up. (at this point I think my sewing machine was over it because it started to jam on me all the time. I had to put the darning plate cover on to reduce the issues I was having. I have a singer curvy and I was told my the sales person it doesn't do well to layers and layers or heavier fabric.)

Day four: this will be the day I do my finishing touches, touch up anything else thing that needs it after I put on and move around, hem the skirt, and take lots of pictures for my conclusion blog. I'll make sure to get pictures of the details.


Friday, June 17, 2016

Summer Floral Flare

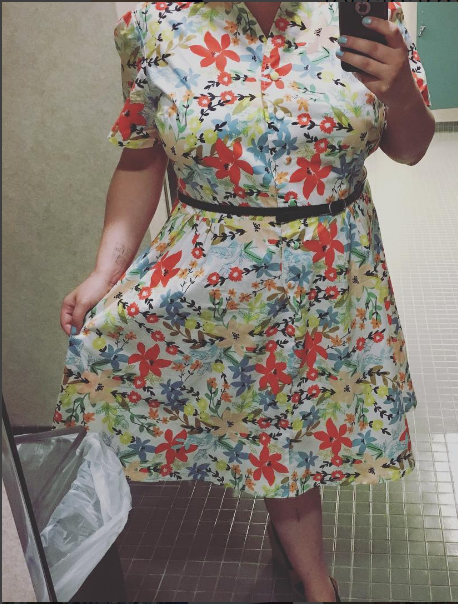
I recently got this very awesome Retro Butterick 1951 shirt-dress pattern in B5920 and had so much fun making it. Now I am a super beginner, and this is my first dress. I found it to be pretty easy to follow along with, however, you will notice the lack of the notched collar because I couldn't figure it out. I also ended up taking off a lot of length from the skirt compared to the original pattern. I am 5'5 and I like skirts and dresses typically right below my knee. This first picture was my finished piece. Again, room for improvements, but I really like this style. More shirt dresses to come. 


(again with that garbage pail)


SMALL
This is the dress still on my dress form with the tailor marks and original length. I wanted you to see the cloth buttons. I went to a vintage store and found a bunch of buttons, however, didn't like any of them and ended up getting a cloth button making kit to do my own out of the leftover fabric. 

 The only thing I want to do is find thicker, funkier belt to really cinch the waist. :)

Hope you enjoyed, 

Comment below, 

Jessi Harm

Monday, June 13, 2016

I am back... With Sewing!

Been a while. Got a Degree. Got a new Job, and oh yea... started sewing. :)

So earlier this year I discovered the amazing fabric and pattern designer, author and seamstress, Gertie, aka Gretchen Hirsch. I fell in love with her vintage, punky style. I bought all of her books and got myself some of her fabric too.
Recently I made a skirt out of her beautiful border print fabric, and followed a tutorial on her blog for a Dirndl style skirt. Links Below. Here is my creation. I paired it with a blazer and blouse from Target. It was light, feminine, fun and very spring :) This is her Rose Garden Border cotton Sateen fabric. I am a beginner. This is the 3rd finished project I have made so there was some room for improvements. 

(please forgive the garbage pail in the photo)
 It was really easy if you follow her tutorial, however I am bigger than she is, and I wanted some  extra lushy fullness, so for my waist measurement of 41 inches, I got 2.5 yards of fabric. 
Her tutorial is below, she broke it into two parts and I really don't think it needed to be that in depth.

Basically is two large rectangles for the skirt, sew up the side seams, but leave a spot for the zipper,  you just need to know how you want your fabric to lay, and I like big hems, so after I chose my desired length, I added 4 inches for a big hem. Same with waistband.  Two long rectangles of desired thickness, plus seam allowance, and width plus seam allowance, and I opted for some fusible interfacing. 

Best thing about this skirt, its a rectangle, so its the easiest hem job ever. I hate hemming skirts. 

Here is Gerties tutorial:

http://www.blogforbettersewing.com/2009/08/sew-full-gathered-skirt-part-one-make.html

http://www.blogforbettersewing.com/2009/08/make-this-skirt-part-two-of-gathered.html


Hope you enjoyed. 
Comment below, 

Jessi Harm

Friday, March 8, 2013

"The Honest Life" by Jessica Alba review.

     I am so excited to do this review for you. I have done several books and DVD reviews, but this one I am most excited about because it’s a product that promotes something I believe in. The book is beautiful. There are several lovely colored family photos, beautiful text, and graphic designs. The book is 250 pages long and as graceful as its writer.

Here is my review of the book. At the bottom are links to where you can by the book, as well as Jessica Alba's company web page and more.


     "In The honest Life, actress, activist, and entrepreneur Jessica Alba inspires readers to make affordable healthy, nontoxic choices for themselves and their family- from the food they eat to the products they put on their skin, and the materials they use in their home- without sacrificing style."


     "The Honest Life: Living Naturally and True To You" by Jessica Alba is an extremely informative collection of tips, tricks, facts and life lessons. She promotes the idea of living a healthy and natural lifestyle, without feeling like a lecture. She brings her own past and experiences to the table, as well as several hours of research, working with some of the best in the fields of natural health.
     Jessica Alba asks why anyone should have to choose between nontoxic, eco-friendly, and pure products, or affordability and style. That is why she got inspired to get informed, and start her own company, where healthy natural decisions didn't have to be boring anymore. Where natural and pure products didn't have to be expensive and lack performance.

     Jessica Alba talks about everything. It covers hygiene products, beauty products, cleaning products, food, hobbies, affordability of organic living, (or at times, the lack thereof) and so much more. She talks about key harmful agents in many household items, such as but not limited too, Formaldehyde, Mercury, Parabens, Petrochemicals, and Lead. Products that we use every day could be causing hormonal or even  minor nerve damage over long term exposure. She talks about where the chemicals are found, why they are bad, and how to work around them. There is even an easy to understand reference guide in the back of the book.

     The book is filled with many uplifting stories, tons of inspiration for beauty, fashion, dinner parties and hobbies. It has lots of natural recipes for product alternatives, plus some of her personal food recipes.

It truly is a fun read, a very informative read, and an inspiring read.


     There are even a few chapters for parents or expecting parents. However, you do not need to have children to get the benefit of this book, the majority of the information is based on a clean, healthy, day to day lifestyle. She was inspired to write, and start her journey during her pregnancy, but she primarily promotes keeping harmful things out of your life and bringing in safe effective alternatives.

     Jessica Alba "The Honest Life" is truly something that everyone needs to read. It’s an eye opener. However, there is no judgment in the book. She doesn't beat into the reader how 'horrible our current lifestyle is, and if you continue to use it you are a bad person'. Jessica simply shares her experiences, what she has learned, and how she avoids or works around these issues. She lays the information out for you to take it or leave it. Her true desires and passions are simply to get the information out there so everyone at least has the chance to be informed. PLUS, it’s written in a way that is extremely easy to understand. It's not over-saturated in science or medical terminology like other books I have read on similar subjects.

     This book is backed by her personal experiences and tons of research conducted by her and countless professionals in the specific fields. She didn't write a book on opinions, Jessica really did lots of research of the issues she talks about in the book and worked with many different specialists to make sure she is bringing you the most accurate and current information possible.

     I truly love and stand behind this book 100%. Please check is out. Again it’s called "The Honest Life: Living Naturally and True To You" by Jessica Alba. I have linked it several different times throughout this blog. I Love www.rodalebook.com, and that is where I purchased mine, so that is where I linked all of you, However, I am not paid or endorsed to do so, but I love so many of their products, I hope you take a look around and find other inspiring works.


     Here is a link to Jessica Alba’s company website. She has started a company that sales and promotes, affordable, safe, CLEAN formula products for everyday living. They have sample packs, so you can try sets of multiple products, all you have to pay is shipping and handling. It is only ($5.95) which I highly suggest.


Questions or Comments please leave them below!
Jessi Harm

Saturday, December 1, 2012

Perfect nails everytime!

I was getting so tired of painting my nails, and smearing them before they dried, them chipping by the next day, or them looking dull, and the paint not going on even. So I found some great and helpful links and I am going to show you how to make perfect nails every time!

First things first: 

BASE COAT: this made the biggest difference. This alone made a drastic improvement It helps the polish stay in place, it provides an even primed surface for the polish to go on and stick too.

NAIL POLISH: The base coat will help your polish stay, but another thing to consider is getting a decent polish. the 99 cent polishes really don't cut it. If you can, get a nice name brand polish, it makes a big difference. Don't have to spend a lot of money, but don't get the cheapest stuff you can find.

ALSO: make sure your nail polish isn't old or expired. Polish typically has a shelf life of 2 years or less. So it's important to keep up with it. Over time the bottle dries out, and colors separate making it undesirable to use when trying to achieve beautiful nails.

Make sure you have all your tools out and ready to discourage you from bumping or smearing before they dry. Also try to do your nails when you have a few minutes to sit down and spend time on them, as well as giving them time to dry.

WHAT YOU NEED:

-Base coat
-color polish
-nail clippers
-emery board/ nail file
-buffing pad (optional) 
-cuticle pusher/cuticle trimmer (optional)
-nail polish remover (to remove old polish and clean up after)
-cotton balls (optional, for removing old polish)
-Small paint or makeup brush (for clean up)

Step one: Set up your station, with your supplies in reach. Remove all leftover polish and wash your hands. Focus especially on your nails and cuticles to remove and particles, dirt and excess oils.

Step two: Push down and trim your cuticles if needed, then clip your nails to a desirable even length, file if necessary, and buff away any rough edges, and smooth down the surfaces. Wash and dry hands again if you want.

Step three: Apply your base coat. One layer should be okay, just make sure its even. Follow base coat and color applications shown in the picture below.

So the first link is to show you how to properly and evenly apply the polishes. Base and color. I usually do one coat on all fingers before I go back and start the second and third coat. Three coats are usually good.


The next link is how to clean up you nails after you get the polish done. Get yourself a very small paint or makeup brush, and dip it in remover and wipe around edges and any mistakes. 


Here is the link to her blog where she has a wonder manicure tutorial herself

Other tricks people have mentioned is putting a jelly or ointment around the edges of the nails so any polish won't dry on the skin and it is very easy to clean up after. I have also heard about putting tape around the edges also. Hope it helps.


I hope you enjoy these tips and tricks, and if you have any more please let me know.
Have a wonderful weekend, 
Jessi Harms